

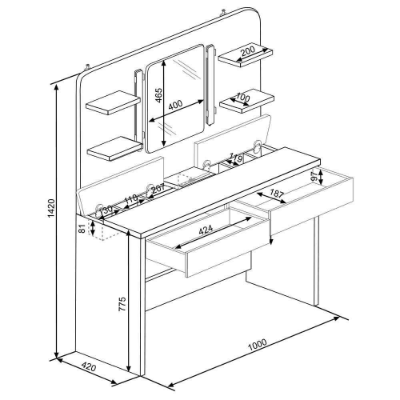
If you are looking for a vanity desk with drawers that is functional and affordable, then this article is for you. In this article, we will show you how to make one yourself without spending too much money.
Everyone always wants to get something cheaper but utilities better, so we have provided a variety of DIY hacks, including six corner desk ideas, Gamer desk setup ideas, and vanity desks with drawers.
How To Make Vanity Desk With Drawers?

Gather Materials
Before you build your vanity desk, gather the materials you need to continue in the middle of the project because you need to include something. The list below includes everything that you need for this project:
- One 2x4x8' lumber board
- Four legs (24" long)
- Four corner braces (1 3/8" x 3 1/2")
- Two hinges with screws
- One drawer lock with screws
- One latch with screws
- Paint or stain
Techniques Use For Making Drawers
If you're looking for a desk that has drawers, you can use the same techniques that you would use for any drawer. You will need to measure the opening and determine how deep your drawers need to be.
- Measure the opening for your vanity desk. Measure from top to bottom and side to side.
- The measurements should be taken with a tape measurer, but if you don't have one handy, use a ruler as a substitute.
- If you make a vanity desk that opens on both sides, ensure that each side is at least 12 inches wide to accommodate two people.
- Cut out the drawer box using your measurements as guides.
- If making this vanity desk from scratch, cut the wood into two separate pieces and then connect them using nails or glue to create two separate boxes.
- Attach handles to each end of the drawer box using screws or nails so that it is easy for someone to open them up and get inside them.
- Make sure there is enough space between each handle so that someone can avoid accidentally pulling off both handles at once when they want only one opened up at a time.
- Finish off this piece by adding paint or stain to give it an attractive look that matches other furniture in the room.
- If you want to make your vanity desk with drawers, this project is fairly simple and should take a little time. It can be made out of any wood you choose and painted or stained in any color you prefer.
- While assembling and designing your vanity desk, there should be better cable management on the desk so that you will not suffer from scattered cables while working
Once All Materials Ready
Once you have all of your materials ready, the first thing that you will want to do is cut all of your pieces down to size using your miter saw. If you don't have one, no worries; use a handsaw instead!
After cutting down all your pieces, sand them until they are smooth and clean. Then take any remaining nails out of each piece using a hammer and nail puller tool (if necessary).
Next up is assembling the vanity desk itself! Make sure that all the boards are lined up straight before nailing them together — this will ensure that everything lines up properly when it comes time for attaching the drawer slides later in the process.
Steps To Follow
The following steps will help you make your DIY vanity desk:
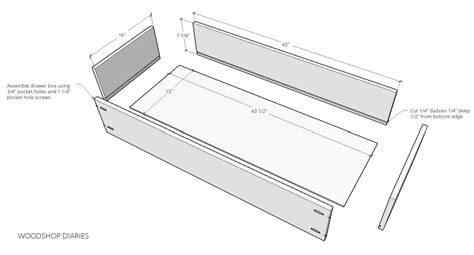
1) Cut the plywood according to the measurements given below:
a) Bottom piece - 42 inch x 13 inch (or as per your requirement)
b) Top piece - 42 inch x 12 inch (or as per your requirement)
c) Drawer fronts - 4 pieces at 3 inches wide each
2) Cut the MDF board according to the measurements given below:
a) Side pieces - 2 pieces at 34 inches x 1 inch each (or as per your requirement). You can also use 2-inch thickness plywood instead of MDF board in this step if you want to make it sturdier.
b) Front Top and Bottom Panels - 1 piece at 17 inches x 1 inch each (or per your requirement). You can also use 2-inch thickness plywood instead of MDF board in this step if you want to make it sturdier.
c) Back Panel - 1 piece at 34 inches x 1 inch each (or as per your requirement). You can also use 2-inch thickness plywood instead of MDF board in this step if you want to make it sturdier.
d) Drawer sides - 4 pieces at 25 inches x 1 inch each (or as per your requirement).
e) Drawer fronts - 4 pieces at 22 inches x 6 inches each (or per your requirement).
Things To Consider While Planning
When you are planning out a vanity desk with drawers, there are a few things that you need to consider.
- The first thing that you need to do is plan out where the drawers will go. You want to make sure that they stay in the way of your work and movement around the desk.
- Next, you need to decide on the size and number of drawers you want for your vanity desk. This can be anywhere from one drawer to three or four drawers. It all depends on how much storage space you need for your items or stationery supplies.
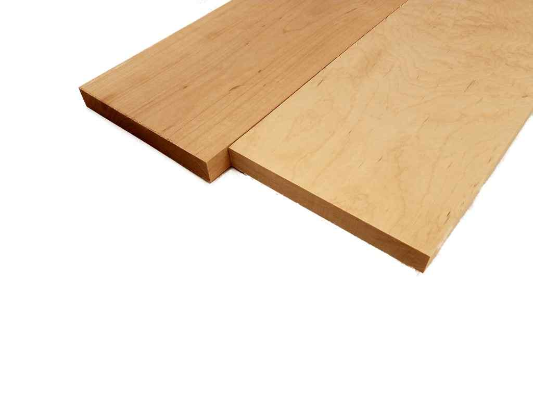
- Once you have decided on the number of drawers you want, it is time to start thinking about what type of wood products they should be made from. Usually, people will choose pine wood because it is cheap and easy to find at home improvement stores like Home Depot or Lowe's. However, other types of wood can also be used, such as oak or maple, depending on the look you want for your vanity desk with drawers (see picture).
- The next step involves cutting out all of the pieces of wood for each drawer separately using a table or circular saw. After this has been done, it is time to start assembling each drawer.
- The next step involves cutting out all of the pieces of wood for each drawer separately using a table or circular saw. After this has been done, it is time to start assembling each drawer.
Final Verdict
The first thing to do is to decide how many drawers you want to have and what their dimensions should be. Next, you need to plan out your drawer fronts. Once this is done, it's just a matter of creating the drawer boxes.